October 23, 2026 · 7 min
Curbless shower installation: what happens under the tile
The tile is the last day of the job. Everything that decides whether the floor drains and stays dry is done in the days before it.
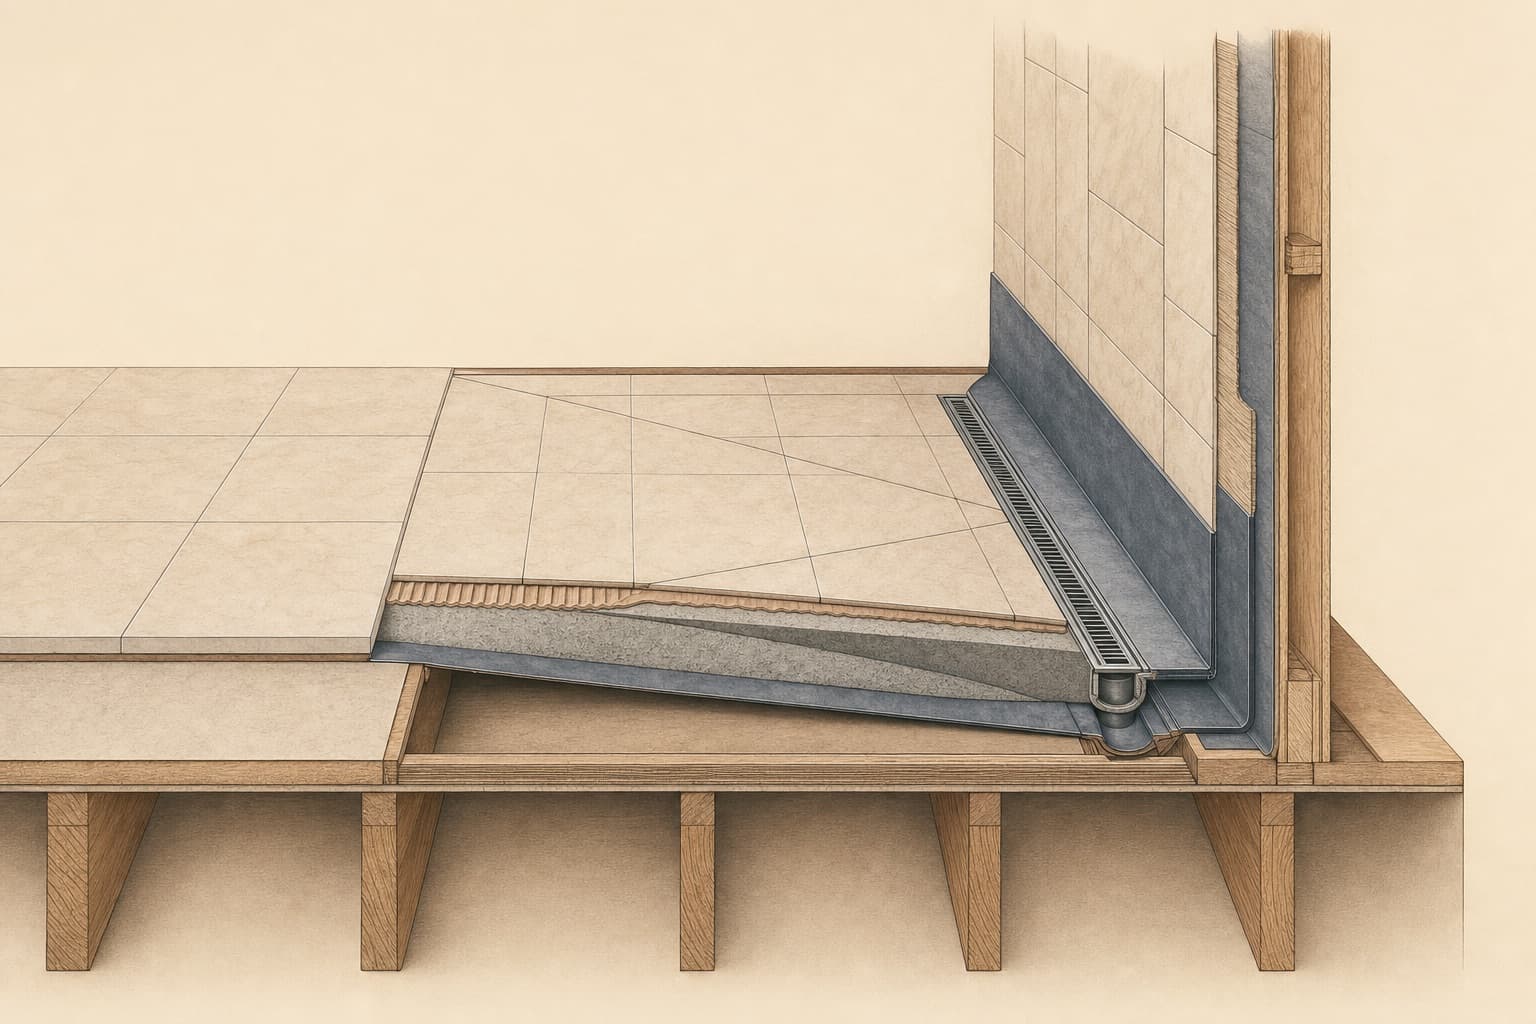
A curbless shower installation is mostly invisible work. By the time the tile goes down, the floor has been opened, lowered or built up, sloped, waterproofed and tested. The order below is the order the work is done in, and each step is one a homeowner can ask about before signing anything.
Opening the floor
The existing tub or shower comes out, along with the floor finish in the shower area and often beyond it. On a timber floor, the joists are exposed so that their size, direction and condition can be seen. On a concrete slab, the area to be lowered is marked and the position of the drain line below is confirmed. Surprises are found here, which is why a good quote says how they will be handled.
Making room for the slope
On timber, the subfloor in the shower area is set lower between the joists, or the joists themselves are altered, which is a structural change that may need an engineer and a permit. On concrete, the slab is cut and lowered in the shower area. The alternative, raising the rest of the bathroom floor, avoids touching the structure but creates a level change at the doorway that has to be dealt with.
The drain and the slope
The drain is positioned and connected, and the floor is given its fall toward it, either with a sloped mortar bed or with a prefabricated sloped board. A linear drain along one wall lets the floor slope in a single plane, which suits larger tiles. A central drain needs the floor shaped in four planes, which suits smaller tiles. Either way, the slope has to be continuous: a low spot holds water.
The slope is gentle, enough for water to run but not so much that the floor feels tilted underfoot. Getting that balance right over the whole area is a matter of careful screeding or of a well fitted board, and it is checked with a level and with water before anything is covered.
Waterproofing
A membrane is bonded over the sloped floor, lapped up the walls, sealed around the drain and carried well beyond the shower area. Corners, seams and pipe penetrations are reinforced. This is the step that most decides the life of the floor, and the one to ask about most directly. What good waterproofing looks like is described on the bathroom upgrades page.
Testing before tiling
Once the membrane has cured, the drain is plugged and the shower floor is flooded and left, so that any leak shows before it is covered. A flood test takes time and costs little, and an installer who skips it is asking to be trusted on the one thing that cannot be checked afterwards.
Tile, glass and fittings
Tile follows the slope, with a slip resistant finish chosen for wet use. Glass, if any, is fixed. Valves, a handheld shower on a slide bar, a seat and grab bars go in where the walls were blocked to take them. Blocking is wood fixed inside the wall before it is closed, and it is far easier to add at this stage than later. Anchoring is covered in the grab bar article.
How long it takes, and why we do not quote a cost here
The duration depends on the structure, the curing time of the mortar and membrane, and any permit inspection. The cost depends on the same things and on the finishes. A number published here would be wrong for most rooms, and the factors that move it are on the cost factors page.
Throughout the work, ask to see each stage before it is covered: the opened floor, the slope, the membrane and the flood test. An installer who is proud of the work underneath will be glad to show it.
Ask how the floor will be built
A curbless installation quote should describe the structure, the slope, the membrane and the drain. Ask for one written that way.